
Atmel have added a new feature to Atmel Studio from 6.2 on-wards including 7. You can now create a single file that contains all the data needed to program an AVR or ATxmega microcontroller. This includes flash, EEPROM, fuses, lock bits and ATxmega User Row. This is called an ELF production file and Kanda AVR Handheld Programmers now support this format.
Microchip PIC MPLAB has always been able to create one file that contains all the data needed by a device programmer but AVRStudio has not had this ability until now. It has finally arrived but you have to do all the work to add the data needed.
Adding Data to Your Project
You can do this in code with a C project or use the programmer dialog.
Code Example for ATxmega
Here is a code example that defines the different memory sections for ATxmega.
#include <avr/io.h>
// Example data for ATxmega128A1
const char eeprdata[] __attribute__ ((section (“.eeprom”))) =
“Hello EEPROM”;
const char fusedata[] __attribute__ ((section (“.fuse”))) =
{0xA2, 0x00, 0xFF, 0xFF, 0xFF, 0xF5};
const char lockbits[] __attribute__ ((section (“.lockbits”))) =
{0xFC};
const char userdata[] __attribute__ ((section (“.user_signatures”))) =
“Hello User Signatures”;
AVR C Code Example
#include <avr/io.h>
#include <avr/eeprom.h>

int EEMEM test = 12345;
char text[] EEMEM = "Hello World";
  FUSES =
  {
	.extended = 0xF8,
	.high = 0xDD,
	.low  = 0xFD
  };
  LOCKBITS = (0xFC);
Make sure your AVR device has all these fuses. For example, ATmega16 does not have extended fuse and you will get a compiler error if you include it. If you don’t want to use Hex values, you can use fuse names to make it clearer like this.
FUSES =
{
   .high = (HFUSE_DEFAULT & FUSE_JTAGEN),
   .low  = FUSE_CKSEL1,
   .extended = (FUSE_BOOTSZ0 & FUSE_BOOTSZ1 & FUSE_BOOTRST);
};
LOCKBITS = (LB_MODE_1 & BLB0_MODE_3 & BLB1_MODE_4);
To see all the fuse defines in Atmel Studio, right click on HFUSE_DEFAULT and select Goto Implementation. All the fuse bits are defined in the correct version of io.h, eg “iom16.h” for ATmega16, which Studio selects from project device setting. The EEMEM define will create EEPROM data that will be used to create an EEP file but it will also be added to the ELF file. EEMEM is just a define of a section, __attribute__((section(“.eeprom”))), in eeprom.h.
The linker will automatically create an ELF file with this data in it, except you need to configure the linker to know where to put the User Signatures on an ATxmega. It already knows where to put EEPROM, fuses and lock bits.
Choose Project -> Project Properties and in Properties Dialog select Toolchain.
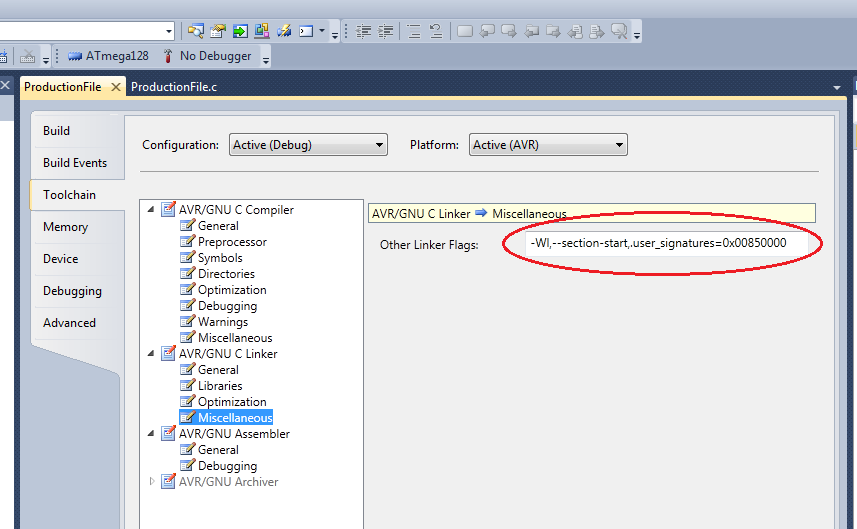
Select Miscellaneous and add this flag:
-Wl,–section-start,.user_signatures=0x00850000
When you build the project an ELF file is automatically created in the Debug folder, along with separate Hex files for flash and EEPROM. Studio doesn’t create a separate user signature file though.
Create ELF file from Programmer/Debug Tool
You can also create an ELF file in programming or debug tools like AVRISP-MKII, Simulator or Dragon. Select Device Programmer from Tools menu and select your tool, click apply. Choose Production File from the left pane:
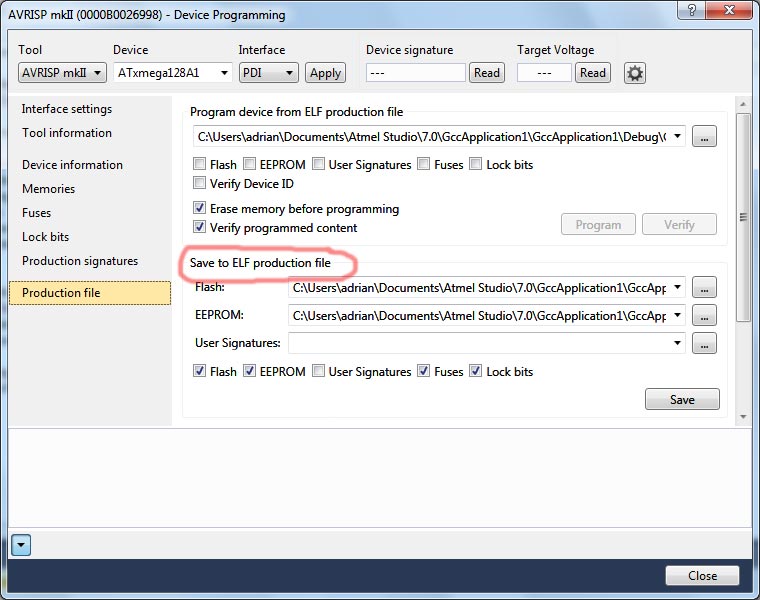
Set the fuses and lock bits first on the Fuse screen and Lock Bits screen. You will need to click Program button after you have changed them before the new values are saved. Select your code hex file and EEPROM file (in Project -> Debug folder). Then save the ELF file.
Using ELF File
The ELF file is a debug file but there is a tool to produce a hex file output from it, avr-objcopy.exe, which is part of AVRStudio install. The resulting hex file looks like this
:100000000C94FA000C940A010C940A010C940A0155
:100010000C940A010C940A010C940A010C940A0134
:100020000C940A010C940A010C940A010C940A0124
:100030000C940A010C940A010C940A010C940A0114
:100040000C940A010C940A010C940A010C940A0104
:100050000C940A010C940A010C940A010C940A01F4
:100060000C940A010C940A010C940A010C940A01E4
:100070000C940A010C940A010C940A010C940A01D4
:100080000C940A010C940A010C940A010C940A01C4
:100090000C940A010C940A010C940A010C940A01B4
:1000A0000C940A010C940A010C940A010C940A01A4
:1000B0000C940A010C940A010C940A010C940A0194
:1000C0000C940A010C940A010C940A010C940A0184
:1000D0000C940A010C940A010C940A010C940A0174
:1000E0000C940A010C940A010C940A010C940A0164
:1000F0000C940A010C940A010C940A010C940A0154
:100100000C940A010C940A010C940A010C940A0143
:100110000C940A010C940A010C940A010C940A0133
:100120000C940A010C940A010C940A010C940A0123
:100130000C940A010C940A010C940A010C940A0113
:100140000C940A010C940A010C940A010C940A0103
:100150000C940A010C940A010C940A010C940A01F3
:100160000C940A010C940A010C940A010C940A01E3
:100170000C940A010C940A010C940A010C940A01D3
:100180000C940A010C940A010C940A010C940A01C3
:100190000C940A010C940A010C940A010C940A01B3
:1001A0000C940A010C940A010C940A010C940A01A3
:1001B0000C940A010C940A010C940A010C940A0193
:1001C0000C940A010C940A010C940A010C940A0183
:1001D0000C940A010C940A010C940A010C940A0173
:1001E0000C940A010C940A010C940A010C940A0163
:1001F0000C940A0111241FBECFEFCDBFDFE3DEBF99
:1002000000E00CBF18BE19BE1ABE1BBE0E940C0136
:0E0210000C940D010C940000FFCFF894FFCF6A
:02000004008179
:0D00000048656C6C6F20454550524F4D0017
:02000004008278
:06000000A200FFFFFFF566
:02000004008377
:01000000FC03
:02000004008476
:0300000002971E46
:02000004008575
:1000000048656C6C6F2055736572205369676E612B
:06001000747572657300B7
:00000001FF
The code is at the top, followed by extended address markers (04 record type) that define the EEPROM at address 0x810000 (:02000004008179), Fuses at 0x820000 (:02000004008278), Lockbits at 0x830000 (:02000004008377), Device ID (stored backwards!) at 0x840000 (:02000004008476) and user row at 0x850000 (:02000004008575). These addresses are well beyond the size of the biggest AVR microcontroller and won’t clash with flash code.
If you want to know more about Intel Hex file format, see Intel Hex Files Explained Post
Kanda Handheld programmers for ATxmega and AVR can now load ELF files, which makes it easier to send files to production.
MPLAB X Files
Now that Microchip own Atmel, they have been adding AVR support to MPLAB X. This will generate hex files that include the same extra data as Atmel Studio ELF files but in hex file format.
To add Fuse data to your AVR project in MPLAB X, go to Window -> Target Memory Views -> Configuration Bits and fuse values can be set.
ELF file loaders, like in Kanda handheld programmers, will deal with these new type of AVR hex files as if they were ELF files.